Pages

Sunday, May 29, 2016

Upcycle for Puppet Fun


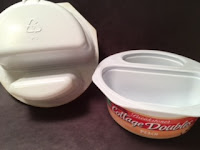
I found  bunch of these containers under the sink. They were in my "new to me" art room when I started at my current school.
Didn't really know what to do with them until one day when I started to play with one of them.
 OMG! This would make a perfect puppet face! So I played some more.


 I painted it with acrylic paint. Did some details with Sharpies after the paint dried. I knew that I wanted to add a cloth body and the only way that was going to happen was if I glued something around the face that I could sew a body onto.
 The lion is the original puppet that I made and if you look at the photo above, I glued on a nice heavy braid that I also found when I inherited the art room.
However, at home this weekend I opted to make another one since I didn't have any photos of the process to share with all of you. So I found some interesting leftover trim to glue onto my puppet's face.

Now for the body. I made the pattern for the body. I traced the shape of the container onto paper that was folded with the opening edges down the middle. See the photo below on the right. I'm seriously hoping a picture is worth a million words because I did this a number of years ago so the photo is just to show you how the pattern should fit the container. (If you plan to do this and need more of a step by step, let me know.)
The 2 short sides get sewn together (by students)  and then turned right side out.

When I had decided to do this with my students I got a grant from PTA for the fabric. Since I really didn't want any waste and didn't want to take the time for the students to cut the fabric, I did it. I knew my art room scissors were not up for the challenge. Below is how I did it fast and efficiently! Cutting several out at a time.


Next is attaching the body to the face. Might be a good idea to teach students how to thread the needle so that you are not doing it over and over and over again..........
 I use what is called the alligator method. Fold a small piece of paper in half, have it gobble one end of the thread and have that alligator mouth go through the eye of the needle.

Now for the knot. I take the tail of the thread and wrap it a few times around the point of the needle.
 Then I slide all of it over the eye side of the needle.  Pull it off the needle and I have a knot.

I pinned the body to the face and just did a basic up and down stitch. Make sure students understand where they are attaching everything so that they don't sew all the way through and can't get their hand in the puppet.


Before I cut the plastic holding the bottom of the trim together.
After I cut the trim.


Puppets made by my students.


I found these containers in the supermarket last week that can be used along with Cottage Doubles by Breakstone.
I think it's time to put the word out for these containers so that I can do this project again!

I'm curious, what's your favorite recycle/upcycle project? OR do you have a million of something in your room that you don't know what do do with??? Send me a photo or send me a few and I'll play with it and come up with some ideas!!

Thanks for reading!


Sunday, May 22, 2016

Potato Head Fun!


Gotta start out by telling all of you that it was hard to decide which picture should go on top! So I used an app called PhotoGrid to make the collage above.

Read on to see the fun that I have had with Mr. and Mrs. Potato Head!

For some reason that I just can't explain I love Mr. and Mrs. Potato Head. I love the creativity that has gone into making them into a variety of characters. Just do a Google search and you will find they have been turned into Star Wars & Wizard of Oz figures, superheros, rock stars like Kiss & Elvis, and so on.

In all started back in 2004 when I went into Orlando with my sister and we went shopping in downtown Disney. They have a store there where you can fill up a box with a potato head and all necessary parts to make different Disney characters. I ended up going back with my BFF.

And I have conveniently forgotten how many times I filled up one of those boxes. Most of my grandchildren at one time or another have played with them. Although, there are some in boxes that are off limits like Indiana Jones and Sponge Bob.

Anyway, so when us art teachers teach our students we tend to incorporate things that we love into our lessons. And that is what I did when I taught a lesson on mixing the color brown.

I tell students that to make a primary color we would need to get it from nature. Well I happened upon some red dirt which they added green paint (its complementary color) to make the color brown.

There were tracers for the potato and some of it's featured parts. Yes, I occasionally use tracers with my students. It is no different then using a pattern to sew with.


 I think they came out great!

Now you may be wondering about the photos in the collage above. At some point when I realized the Potatoes Heads turned 60, I had a party for them. Turns out it was the same year my husband turned 60 so I already had the signs available.
Now these photos-
Were from a photo shoot with my new digital camera 10 years ago. The photos above were as they waited in line for their turn.  Harmless fun........

Above just a few, as I took so many photos that day, my batteries died.

Then two years ago I needed a costume for school (favorite character) and I just had to make this.
I made the pattern by laying out a dress and doing the body shape around one side of it. When I do things like this I tend to fold everything in half to get it symmetrical. It is made out of felt so I wouldn't have rough edges. And in order for the ears to stay up I have cardboard tucked in behind it. I made it in under 3 hours so the face features do not come off, maybe if I thought about it I would have used velcro so I could have made it interactive. Glued flowers onto a visor added the shirt, gloves and legging and it was perfect! Students totally enjoyed it!

There you have it Potato Head Fun! I think the next time, maybe, I'll do a drawing lesson and bring in my Potatoes to model........ maybe. There are some things that are just to hard to share.

What is something you love that you shared with your students??

Thanks for reading!!