Pages

Sunday, November 26, 2017

Positive and Negative Space

My state standards include teaching 3rd graders about Positive and Negative Space. I provided patterns and a storyboard for this lesson. And while many of you frown about "cookie cutter" lessons, you gotta start somewhere. You can also consider this a practice lesson and have students create they own pattern for Higher Order Thinking.

The first class I did this lesson with, I had a lot of confused students. That's what made me decide to have patterns available for them. (Positive/Negative pattern is available under the Resource page.) Next time I plan to photocopy patterns onto colored paper to make it even easier for them. We had a discussion on what positive and negative space is.

Students picked out a pattern and got a 12x41/2" black piece of construction paper, and a 9x12" piece of white drawing paper.

Students learned about making a continuous cut and were cautioned that there were no scraps with this project. (Except for the pattern pieces.)

They were instructed after cutting everything out to place down their cut pieces before gluing them.
Students who finished early were sent around to help others.

When children returned the following week to art they were instructed on how to use the white pencil on the black side and the black pencil on the white side to add details. Symmetry was reviewed and expected as part of their project. Black and white paper could also be used for details.


Students loved doing this and many of these wonderful projects will be out on display for the 3rd grade concert next month. The 4th and 5th graders were disappointed they weren't doing them.

Check out my blog post from the last time I did this lesson: Art on a Cart. Definitely art cart friendly!

Hope everyone enjoyed their Thanksgiving break! I've got some new lessons I'll be doing between now and the winter break. Can't wait to share them!

Thanks for Reading!


Wednesday, November 15, 2017

Itsy Bitsy Spider


The project that inspired this lesson is in the book 25 Terrific Art Projects.  By Karen Backus, Linda Evans & Mary Thompson.

The beginning starts out the same. I started by reading this book to my students.
Then I directed them on making the spider web by modelling and reviewing our vocabulary for the different lines we learned about.
 Draw a diagonal line, make an X by drawing another diagonal line.
                                  Add a vertical line.                    Add a horizontal line.

                                   Add some curved lines all around.

I did this with kindergarten, 1st and 2nd grades. Now for how I changed it out. Students were instructed to draw where their web was. Was it in front of a house? a garden? a porch chair?


 Depending on time you might be able to draw and paint during one session. We used crayons and watercolor paint on 12" squared manila paper. I saved making the spider for last and I changed that out as well. The book called for using salt dough and I decided to use plastic Dananimal containers.

Here are the steps I took to prepare the bottles.
                                  Using a box cutter, cut off the top.   Then cut the bottle in half.
      Remove and discard label. Using the point of a compass make 2 holes on each side.
          Using a hole-punch make a hole in the bottom and attach about 10-12" of yarn.
                                    (I did have some of the older students attach the yarn.)

When students returned to art, I modeled for them how to make the spider. I demonstrate to them that regular markers will rub off of the plastic, so we will be using Sharpies, because they are permanent. (It's so cute because some of the students tell me they are not allowed to use those markers....)


The spider legs are made from pipe cleaners. Two of them will make 8 legs. I show 1st and 2nd grade how to fold the pipe cleaners in half, then place the fold all the way down between the blades of the scissor and to pull on the pipe cleaner as they squeeze the blades of the scissor together. I cut them for kindergarten.

Now they have 4 pipe cleaners, one for each hole in the two sides. After inserting the pipe cleaners, they will fold it in half to create 2 legs, then twist them together, close to the body, and bend them to look like spider legs.

Then I stapled them to their beautiful web paintings.


The primary students loved doing these spiders and they were really excited to have donated their Dananimal containers for this project. I do believe the older students were upset not to have made them when they were younger. They don't understand the need we have as art teachers to change it out and perhaps wait a few years to collect what we need for the project.

Now it you have followed this blog recently, you will have read about my storyboards for the students to see step-by-step directions. I didn't do it with this project and I gotta say it needs to happen. Even if I use photographs for the storyboard. Turns out it just goes so much easier. I did have students that completed their spider to help others. That's always a good thing for the early finishers to do.

As a Title One school using recycles is so vital to stretch the budget.

What, if any do you make with recycles??

Thanks for Reading!


Monday, November 6, 2017

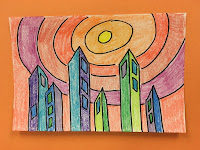
A City of Warm and Cool Colors

As an art teacher I am always looking to change out a lesson to just do something different or more exciting. The internet has been such a remarkable source of inspiration for all of us. And that is where I found this lesson a few years ago when I was looking for another way to teach my students about warm and cool colors.

I found this lesson here on There's a Dragon in my Art Room, a blog written by Phyllis Levine Brown. I've had the opportunity to meet up with Phyl during NAEA conferences.

Here's a photo from New York 2017. Phyl, Rachel Hessing Wintemberg who blogs the Helpful Art Teacher and me.

This is a really good lesson to get students thinking about perspective. And while they don't completely get the concept (tricky concept for elementary students.....) it helps a little.

Here is my storyboard, something I started at the end of last year. While technology is wonderful, I believe my students benefit from a constant visual to look at.

You can see just how easy each of the steps are. I did have students practice in their sketchbooks before doing it on the large paper with Sharpies. That was a big help.
        Students start out with arrows, extend the line to the bottom edge.

 They add windows, I did point out using parallel lines to make the windows, some got it and some didn't. Then add the concentric circles.

Decide whether to use the warm colors on the buildings or the sky. Then use the cool colors on the sky or the buildings. Students used crayons, I went over the color wheel with them. Included all 12 colors and we decided red violet would be warm and yellow green would be cool. I had the colors separated and we started out by using only the warm colors until they understood the assignment.


I just did this lesson with my 2nd graders and I'm really happy with the way it turned out. And since it was so close to Halloween when we started the project, students added their own holiday flourish to their art.

Thanks Phyl for a really great lesson!

How do you teach warm and cool colors? I'd love to hear from you!

Thanks for Reading!