A Rainbow of My Own, a lesson to help learn the rainbow AND at the same time practice using scissors-correctly and safely. I prepare this lesson by photocopying the zig zag page from the book: Little Kids Cut. I print the page out onto color copy paper, using the colors of the rainbow. If you don't have this book-improvise by making your own practice page.

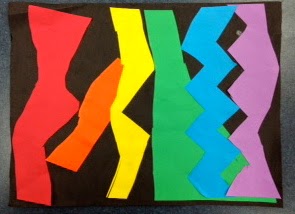
When starting this lesson with students, I read them the book. Show them my sample above. Demonstrate making a rainbow using primary colors of paint, which I overlap/mix to make the rainbow. They do get annoyed they aren't painting, but, I always promise we will soon!
Next, we talk about the parts of the scissor, what fingers go where, keeping our thumbs up. If there's time, we practice holding scissors while walking, passing scissors to someone else. I demonstrate how to cut on the line. Move the paper not your hand. I explain that we will all make a rainbow collage, however, we are all cutting only one sheet of paper. I usually do this over 2 class meetings. And, I explain that the next time they will share all the cut paper.
When they return to art we review what we learned the previous class. Then I read them the book Too Much Glue, in the hope that they will restrain themselves. Hahahaha, I can be so silly sometimes...... Anyway, I do a rainbow collage as the students call out the colors in rainbow order.


Then, they do the tracing, cutting, remove the rubber band, and glue on the body parts. Time permitting they can add accessories and clothing to their bears.
And, last but not least........ since you know I have more to share down the road, or would it be in future blogs.........


Following the same format as above, I read, show samples and demo. The first week is all about drawing the elephant and mixing the color gray. The second week I share a different Elmer story and we talk about lines and shapes and how we use them to create patterns.
I love using literature in the art room, it ties so many things together. It motivates the students, it helps to balance the time with the little one's short attention span. It makes me a good role model as I share my love of reading. And it's especially awesome if it's a book they haven't heard before!
Hope you enjoyed this, thanks for reading and please let me know what books you share with your students!
Wonderful!
ReplyDelete