Pages

Sunday, February 28, 2016

Patterned Elephant

After giving mid year assessments to my students, I realized that I needed to review some concepts that didn't take hold the first time. I also figured out that some of my questions were setting me up for failure.
One of the questions on my exam was: How do we make patterns?
                                              a-with lines and shapes  b-with lines
                                              c-with shapes or  d-with crayons

Lots of students make patterns with crayons.............. Silly me!!

My patterned elephant lesson would not only review patterns but also include values of gray.


 The Elmer book above is a perfect story for this lesson. I modeled how to draw an elephant using the steps from the drawing sheet above. Which is from the book Little Kids Draw. We talked about what happens when you mix white to a color and how we can make the color grey by adding a little black to the color white. And depending on our recipe of how much black and white we used we could get different values or shades of that color.  One routine that I practice when we paint is that they don't get a paintbrush until I see their name on the paper. We have also practiced lining up and placing wet art in the drying racks.

My kindergarten and 1st graders drew, mixed their color and painted their elephants and with clean up we were done with part one of this lesson.

I managed to do this lesson and paint with my students on Wednesday to Friday before I went on medical leave. So directions for my Monday & Tuesday students were different. I really don't want a sub painting with students when I'm out. They traced an elephant onto gray paper, divided their elephants into 5-7 sections and started to add patterns to their sections. They had the sheet below to inspire their designs. I made several of those collages using an assortment of wallpapers.


 Week 2 students on Wednesday-Friday heard another Elmer story (there is a whole series of them). They were to divide their elephant into sections and make a different pattern in each section. They used the sheet above to inspire their designs on their painted elephants.


The above elephants were done years ago-as I'm not there to take photos. I also forgot to get photos of my samples. Sorry. When students finished their patterns, they were encouraged to create a background for their elephant. Monday and Tuesday students also had a story read to them and were instructed to do a background on a separate piece of paper, then cut out and glue their elephant to it.

Gotta say I'm home exactly one week and I'm going crazy....... Missing my students and my art room......... No ones gets how to teach art and subs don't understand how to follow directions........
Sigh........
BY THE WAY THIS IS MY 100th POST!!!!!!!
Thanks for reading!


Sunday, February 21, 2016

Scapes: Land, Sea, City....

Okay, gotta teach about scapes. Actually had a lot of fun with this lesson. I used Rauol Dufy's Mediterranean: Scene for inspiration. AND I really didn't have any samples of my own to share. Which meant my students needed to pull from their own imagination. Which was a good thing!

In my lesson presentation I told them about the different scapes and parts of scapes. That it is outside views of land, cities, sea, etc. And that a scape has a foreground, middle ground, and background.  We reviewed what the horizon line is. Which is a horizontal line where the sky meets the earth. Showed them a few other art posters and had them tell me what kind of scapes and where the back, middle and foreground was. Did a really quick sketch and sent them to their seats to get started.


One group insisted  they wanted to paint, so I pulled out what they would need and instructed them to set it up for themselves. They could also use colored pencils and markers.


I love the landscape with the dinosaur! This lesson was done with 2nd and 3rd graders. I tried it with one first grade group and it just didn't work. But that was alright, they got to hear and possibly learn some vocabulary. 

I totally enjoyed the stories my students told about their scapes and was happy they could name the different parts.

Last night I went to the Opening of 2 exhibits that my 4th grades will be seeing on their field trip to The Leepa-Rattner Museum of Art next week. I thought it important to preview it. Good thing I did, because there were a few abstract lady parts hanging out....... they will now get the speech about being a mature audience....... One of the best reasons for the trip is that there will also be an exhibit of their art. My students did the beautiful flowers read about it here. I shared the space with a buddy of mine from another elementary school in our district.


Now for the really disappointing part..... I will NOT be joining the 4th graders on their trip. I am officially on medical leave for the balance of the school year. I will be having back surgery next month and in the meantime need to do a variety of stuff in preparation. I'm devastated....... I am also missing the NAEA conference next month and a chance to hang with my BFF who would have met me in Chicago.

I do not wish to go into details about the surgery, as my mind blanked after the part about being told to stay home. My husband was with me and he agrees with what needs to be done. My BFF checked out the doctor and informed me that "he is a rock star." So I'm good to go.

I love writing this blog and have no intentions of stopping now. Soooooo when I run out of recent lessons to blog about, I will write about some "oldie but goodie" lessons from the past. AND then about all the lessons that float in my head that I haven't had the chance to do yet!

Hope that works and you all continue to read my posts!! Again thanks for reading!


Sunday, February 14, 2016

Heart Art and Kindness Challenge


Happy Valentine's Day!! Last week I read the book In My Heart by Jo Witek to my kindergarten and first grade students. It's a book about feelings and it sparked some really interesting conversations with my little ones. They also connected the feelings in the book to the movie Inside Out. While both the book and the movie had many of the same feelings there were different ones as well. It was interesting to hear them discuss it.

Sharing this book with them is not my usual game plan for Valentine's Day. We usually make cards. I like teaching them symmetry by having them make hearts. I also do a little positive/negative intro with them after show them how to cut out the heart.

But, I found this book in Target last Halloween (had to go check out all the Day of the Dead stuff the art teachers were posting) and I thought it would be something a little different. Each page shows a girl with a heart inside a larger picture. Inside a house with all the other feelings, inside a red cross because her heart is broken, inside a wolf because she is scared and so on.

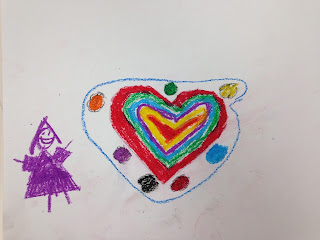
The above student is feeling creative-her heart is in a palette.

Above, he was feeling like having a pizza........


I really enjoyed the art the children were making to express themselves. There was one boy who did a picture of himself watching the Super Bowl, he was feeling lazy..... Unfortunately I neglected to get  a photo of that one. Students used oil pastels and could make their own heart shape or use a tracer.

On a another note- a few weeks ago we had a Kindness Challenge for the students, organized by our guidance counselor. I was asked to have students make posters. I used the flyer below and turned the items on the list into separate statements to inspire the children's posters. They got to pick the sentence they would illustrate.


I'm hoping the success of that week carries throughout the school year! It's so important to show kindness to one another.

 I know some of you do Valentine projects-I would love to hear about them

Thanks for reading!!


Sunday, February 7, 2016

Flower Garden

I am getting my 4th grade students ready to visit The Leepa-Rattner Museum of Art in Tarpon Springs. For many of my students this is going to be their first time going to a museum. What will make this trip even MORE special is that they will SEE their art work displayed on the Student Exhibit wall at this museum!! This is the fifth year that I'm doing this and every year I try hard to improve on the experience for my students. I blogged about that first trip last year, you can read about it here. Last year was also the first time I prepared my students to be art critics and you can read about that here. I also started to add artist's statements to their work, which I know the art patrons enjoy reading.

I believe that I have mentioned that this has been a particularly difficult year for me. While settling into a new room I am also adjusting to dealing with filling children's heads with the standards. AND rigor walks AND mid year assessments AND getting displays ready. I know, it's the stuff we are ALL dealing with-but prior to this year, let's just say the philosophy was more about having FUN in art.

So as hard as I tried to get it together, I didn't really feel I had enough finished art from my 4th graders to make a cohesive display. Sooooooo since the display would be up mid February to April it occurred to me that I should come up with a Spring Theme. And what better project is there then Georgia O'Keeffe flowers?? Now usually I theme the display on what the museum is exhibiting. However, this year it happens to be Florida Artists- Welllll I have over 80 of them!!!
 

I've done this lesson before AND it's one of my favorites (I know I have a lot of favorite lessons, I love being an art teacher!)  Probably shouldn't have done this, but I took a whole bunch of flower photos off the internet (I do credit the artist on the back of each photo) for my students to use.
I explained how O'Keeffe painted as if she was looking though a camera's view finder. (Yeah, had to explain view finder.) I showed them photos of her flowers. Then I modeled using the view finder, lightly sketching out the flower and then painting it. I wanted to get this done in 2 weeks, so I made students stay until they finished painting the flowers. Thankfully, it was during my planning time.


This flower project is the opposite of a crayon resist. Because instead of using crayons first, they used them last.  Some students even used markers and I explained to them they were making art using mixed mediums.

The second week students used crayons to fill in details of the flowers and write an artist's statement.
It started with a writing prompt, their choice. What I like about art.... or I chose this flower because....

Below are some of the finished ones going to the museum.


 Aren't they BEAUTIFUL!! I can hardly wait!!!
Do you have the opportunity for displaying student work at a local museum?
 
Thanks for reading!!