Pages

Sunday, November 29, 2015

Light to Dark Values

Pinterest has inspired art teachers around the world and I am no exception. (Unfortunately I have no idea who originated this lesson, but I am grateful to them.) I really enjoy looking at the value paintings that start from a circle somewhere on the paper and then by adding white and then black you get all these great tints and shades in between. Sooooo I thought I would do them with my 3rd graders. This is what they were doing while other students were doing the Halloween art.
Now I've done value painting with my students before. But I was rather controlling about the whole thing. Students used the color assigned to the table and had to wait to mix up colors until everyone at the table was ready. Also, 2nd graders added black and white only once to their assigned color. While the older ones added black and white twice. It was crazy. Below are samples from what I did before.

This time to be able to give students a choice of color I did things differently. I bought small paper plates and set up each plate with black and white paint, then I called up students by announcing the color I would be adding to the plate.

For the actual lesson I started off by modeling, I traced a circle somewhere towards the top of the page and filled in that circle (the moon) with white paint. Then I gradually added color to the white and continued to paint around the moon. At some point I stopped adding white and painted with the color straight from the bottle, then started adding black for a few rounds. My samples are at the top.


Since my third graders are my last class, they left their paintings to dry overnight.

The following week they used Sharpies to add silhouettes to their paintings. At first I was going to have students do trees, like in one of my samples at the top. But, they had their own ideas. Which in my opinion is a good thing!

Here are some finished paintings. Some appear to have a holiday theme. It's all good! Oh and I also brought in the concept of positive and negative space. Which was fun.....

 One of my nieces spotted some paintings I did for my daughter and decided to buy me canvas to make her some paintings. She is very athletic and was hoping for silhouettes in the poses of the sports she likes to do. I had so much fun doing the lesson above. Check out the paintings I did for her. (She will be crocheting some ear warmers for me.)


 Oh and this month when my School Arts Magazine came I checked it out and saw that I was published again! It's exciting! Makes me want to write some more!! YEAH!
Hope everyone had a wonderful Thanksgiving break. As you can see I had some fun painting, I also did some sewing and rearranged furniture. My husband said it's time for me to go back to work! Hahaha, but I will be off again in 3 weeks!!

Thanks for reading!


Sunday, November 22, 2015

Just Too Many Concepts....


Okay I am guilty of jamming too many concepts at my students in this lesson that we did over the last 3 weeks. This is the first year that my district actually gave us a curriculum to follow. Or at least the first year that I was aware of it. Or maybe decided to follow it because of the end of year exams.  It includes scope and sequence? Yes, I looked it up, it has something to do with the ideas, concepts and topics to be covered. It includes units to follow and in what order. Which has really thrown me off this year. I would have totally set it up differently. Must have missed the memo to be included in that meeting. Sigh.......

Anyway I thought I would attempt to follow the curriculum. But I'm not happy........ I feel in some ways I have lost the joy of what I do best. Every time I look at the curriculum I freeze up. Then I get it in my head to plow thought that stuff, and when I'm done, the fun can begin. Very silly, I know still working it out..... Let's just say my teaching style is old school and leave it at that.

So....... 3 weeks ago I started a project that included the following concepts: texture, mixing primaries colors into secondaries, and making a collage. Oh my!!

Week 1: Texture- I actually sat the students in a circle and passed around different textures for them to feel. I included a basket, cotton balls, hay, sandpaper, fake fur, fake leather (furniture samples that had some interesting textures) and lace. We looked at a poster of this painting (Don Manuel Osorio Manrique de Zuniga by Goya) and talked about the difference between texture we can see and texture we can touch. Students were surprised that the subject of this painting is a boy-which led to another discussion on clothing and history. I still don't think they believed me...... about this being a boy. Oh and in the middle of this craziness I was observed! Got mostly applying, one innovative (passing around textures was a big hit), but I need to develop my attention to scales... YIKES!

Students then worked on making a cornucopia using a basket pattern to show texture. (Oh my pattern-yet another concept I jammed in there....)


They also did some texture on some pre-cut leaves that I had leftover from the fall festival 2 years ago....
 Week 2: Turning red, yellow and blue into orange, purple and green. I displayed a color wheel poster that I have and we went over all the colors and I explained the difference between primary and secondary colors. Then I modeled-which included me tracing, mixing and painting an orange pumpkin, purple grapes and green leaves. I showed them how to use the paint brush to make the purple paint swirl and make circles for the grapes. I did this with my kindergarten and 1st graders, so I was really impressed, they really rocked it! Check out those swirls!


Week 3: Putting it all together or let's make a collage!


Finished projects-

Now mind you I was SO focused on the concepts that I barely even mentioned Thanksgiving except maybe in regard to the cornucopia. So imagine my surprise when I asked my students what we learned about in art and was told "we learned all about Thanksgiving and fall." Yeah.... I'm thinking I jammed way too many concepts in this project.  Time to slow down and have some fun!

Happy Thanksgiving and thanks for reading!


Sunday, November 15, 2015

Veteran Day Activities

I had school on Veteran's Day. Working on Veteran's Day meant we could all have the week of Thanksgiving off. But, because it was Veteran's Day we were asked to have activities for children that related to the holiday. My students were thrilled to be able to do art for the Veteran in their life.

2nd to 5th grades did collages with red, white and blue paper. I had some pre-cut shapes available to save time. We talked about composition and how to arrange the different components for a collage. And it's always good to go over expectations for using glue...... even with 5th graders.


 You can see one of my students is still really into the pop up cards we made here.

The kindergarten and 1st grade project was a more directed project. After a quick book explaining the history of Veteran's Day my students made a poppy flower to "hand" out.
 I had hand tracers for them to use and they had an assortment of skin tones to choose from. Believe me when I say tracing their own hand is usually a disaster. They turn out really tiny and very difficult for them to cut out.
 Then they had 5" squares of red paper that they folded twice and made into a poppy flower.
 
   
See above. Fold in half, then in half again.
     
 Really important, students must point all 4 corners up and then draw the shape for the poppy flower.
Cut on the line, through all the paper at once AND open to reveal a poppy flower!
They then proceeded to glue down the hand with the flower on top. After that they could decorate and detail to their own specifications. My feeling is even with a directed project they can be creative and learn/practice some important skills.

Thanks for reading!


Sunday, November 8, 2015

Ideas for Primary Art Centers

Once in a while between projects and while other classes need to catch up I will let my students do centers. Such was the case a few weeks ago with my kindergarten and first graders. Thankfully the grade levels follow each other in my schedule, so only one set up that day was necessary. The following photos will show how I set up the tables and floor for my students.

Above the red table was set up with 4 boxes of Legos. Two students to a box.

 The yellow table had crayons, paper and some how to draw sheets.
 The blue table contained bins with 2 containers of Play Doh in the same color along with tools and some transparency sheets to work on.
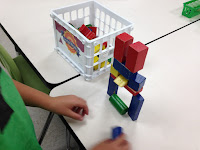
 Green table had blocks and cubes to build with. And the floor had puzzles and books.
I explained to the students what they were doing that day. Basically each table has room for 8 students and there is additional space on the floor. They may go to any center they want so long as they have somewhere to sit. AND if they choose to try all the areas, they must clean up after themselves first.


It was incredible fun for the students to have time to explore and have the freedom to experiment. I have done centers in the past. Click here to find out how my centers evolved.  And click here to get a free list of suggestions for you to have Art Centers for Extended Learning.

I also want to share that I had a Clip Card published in the November issue of School Arts Magazine. (It wasn't the first time I've been published-more on that another time!)
Silly me, I didn't even realize that it was in the issue of the magazine sitting on my dining room table, until I received a check in the mail! Guess I've just been too busy!

Please do take note that School Arts is always looking for articles from art teachers. Soooo if you've got that one, really, special lesson, why don't you give it a try! Click here for writer's guidelines. Not only does a check come in the mail, but you will get extra copies to share and show off to your administration. I call that a win-win! Also, it doesn't hurt to let your students know that people can get paid to write!

Thanks for reading! Leave me a comment, I would love to know if you've been published!