Pages

Sunday, September 25, 2016

The Good, The Bad and The Ugly


As I was thinking about the title for this week's post, the movie titled The Good, The Bad and The Ugly came to mind. The good would represent the lesson I thought was incredible! (Just really happy with.) The bad would be the one I kind of have reservations about...... (The little ones had fun with it and did learn something.) AND since I really adore kid's art work- the ugly would be how messy the tables looked afterwards. (Which I neglected to photograph.)

The good: The lesson I'm working on with my 2nd to 5th students is all about lines, shapes, patterns and space.

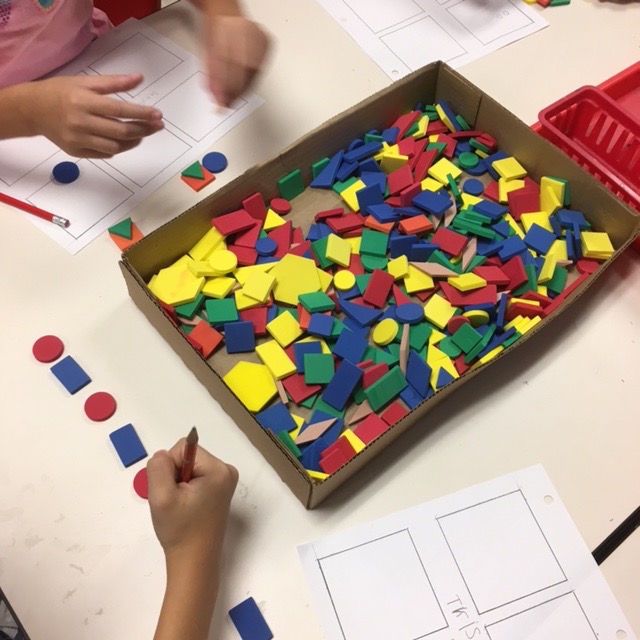
I was given a tub filled with these wonderful foam shapes. My grandson helped me to load up a cardboard tray for each table. I also put out markers and gave students paper with 6 boxes on it to work out their patterns and have a reference sheet for themselves. 
 After a short discussion followed by my modeling with my Elmo (a document camera).

 Students got to play and plan out their designs.
 It was amazing to see how engaged the students became. They also did a great job cleaning up. We will use these sheets in some very interesting ways in the very near future! And of course I will blog about it!

The bad: The lesson with my kindergarten and first graders. I have seen the little rainbow umbrella person all over Pinterest and thought, "What a cute blending primary into secondary rainbow lesson."

 The book I read to students was A Rainbow of My Own by Don Freeman.

I however didn't want to do a full on paint lesson and decided to use these gel sticks from Faber-Castell. The gel sticks when applied to paper have a crayon like texture until you add water with a paint brush and smooth out the texture. A really cool effect! This seemed so quick and easy that I didn't even bother with paint trays........ mistake #1.
Mistake #2 not making sure that the little kindergarten students understood that my tracers are NOT part of their art......
Mistake #3 was using paint brushes that were too big-in other words could hold way too much water and flood their project......

I managed to correct all mistakes by the second day and I did enjoy listening as the children were blending their colors. Soooo if my learning objective was for students to understand how to use primary colors to make secondary colors - then this was a good lesson. 


And while they may seem to all look alike, they really do have their own personality. My reservation is that I would really like to see students do something else to make them a little more unique, but I'm at a loss. All suggestions gratefully appreciated!! I'm thinking students could fill in the background.....

And like I first wrote, the ugly was the mess. Which was no big deal........ it is an elementary art room after all.

I would love to hear about your good, bad and ugly experiences!

Thanks for reading!  
Please share, I'm real close to 50,000 page views and this blog is having a 2nd birthday next month!


Sunday, September 18, 2016

Creating Architecture With Corners

So what do you do when you get a hold of a WHOLE bunch of corners??
Why WE MAKE ART, of course!

First we painted our corners and the cardboard (our base) that would be glued under it.

Then we let them dry.
  
 Then they had to be stored until we returned to the art room to continue working on them. (The corner would be glued to the base on the day they finished.)
Then we got to assemble our houses, castles, forts, pyramids, water slides........
With a wonderful variety of things that had been donated to the art room.


Welcome to our neighborhood.
The corners were the by product of getting all new laptops last year. The pyramid style corners came wrapped around our brand new bookcases. (Shhhhh they were supposed to go back-but, I have awesome custodians.)

We painted using tempera paint. We glued using white liquid glue-sometimes way too much! And we decorated with wooden sticks, paper scrapes, leather scrapes, foam pieces, puzzle pieces, leftover die cut leaves (I don't think I'll EVER use them ALL up!). Buttons, bottle caps and anything else I thought would work. I did this with grades first to third and happily have enough to do with my fourth grade starting next week. Some of the larger classes took 2 class sessions to paint. But some of that was because of logistics. Handing out stuff, clean up and so on.....

I tied in architecture and what an architect does. I read some classes this book, if I felt I had the time.
This project was incredibly fun and was very, very cheap to do! It also cleared up some serious storage space in my art room! (You know...for more stuff??)

I love doing art with my students that re-purposes things that might otherwise clog up a landfill. How about you? Do you have a favorite recycle project??

Thanks for reading!


Sunday, September 11, 2016

Lady Liberty

As a former New Yorker and a citizen of the United States of America I can't think of the terrorist attacks of 9/11 without deep sadness. All over the country groups of people are gathering to remember. In the school district where I teach the Superintendent conducts a Memorial Service at a local park and has asked each year for art work to display at this event. Click here to see what I have sent over in the past.

Last year I was all ready to do the Statue of Liberty, but the park was being renovated so I had to wait until this year. Now usually I send over 1, maybe 2 poster boards of art, but this year the Fine Arts Supervisor was really pushing so I sent over 4 boards.

I usually choose one class to do this project with, but decided to just do it with my 2nd-5th graders that I see on Tuesdays in order to be able to send them out on time. Which was a good thing since we ended up with 2 snow days (in Florida aka Tropical Storm days). However, I really love how they came out and will do it with all the classes that are ahead of the ones who were off due to the weather.

My inspiration for this project was Romero Britto and Peter Max. I did a very short Power Point.
  

 I found some great step by step directions on the internet thanks to Art Projects for Kids.
 Click here for full statue directions.

Click here for portrait directions.
I also found these directions for the Britto inspired Lady Liberty and since this was from last year I can't find my source....... if anyone knows, please let me know!
Children were instructed to draw lightly with pencil, go over pencil lines with Sharpies and then paint with water colors. Using ANY and ALL colors that they wanted to use.


I REALLY LOVE HOW THEY CAME OUT!


Now it seems I have this thing for the Statue of Liberty. I recently came across a Facebook post from an art teacher in New Jersey, Rachel Hessing Wintemberg who blogs as The Helpful Art Teacher. She was asked to illustrate for a coloring book Remembering the Ladies. I was able to contact the woman, Carol Simon Levin, who is writing the book and I did a COLORING page! I choose Emma Lazarus who wrote the poem at the base of the statue.

This may be something I can check off my bucket list!!

Anyway, let's take a moment today to remember all the people who perished 15 years ago today. 
RIP, my high school classmate, Capt. William F. Burke. You will always be remembered.

Thanks for reading!