Pages

Sunday, June 28, 2015

You Know........

Three weeks of summer vacation is gone already! And they were crazy and very hectic! This is gonna be a short post as I am still processing all that went on last week at the Summer Institute on Contemporary Art at Penn State. 

One of the activities I found interesting, especially if you need to bring writing into the curriculum was the following:

On shelves around the room there were over a dozen prints displayed. We were directed to walk around and find a print to write about. We had a choice as to which direction to take the writing.
Our choices were:
 1-Write as if you were the child explaining your art.
2-Write as if you were interviewing the child.
3-Write an observation as the art is created.

I choose the first one. Titled Court Jester, from Femfolio by Miriam Schapiro. Courtesy of Palmer Museum of Art.
 I wrote the following-it was suggested if writing from the child's explanation to throw in a bunch of "you know....".

You know, I got a new paint set from Santa. You know, my parents always bring me back a doll when they travel. You know, I love my dolls and I made a picture with them. You know, I keep my dolls in a case, right? So I painted the case first. You know, my favorite doll is Raggedy Anne, I love her. You know, that doll is from Japan. You know, I decided to put myself in the middle of the picture. I'm wearing my favorite shirt.You know, that doll above the Japan doll, I named her Sally. On the other side that's Joseph, then Madeline. You know, that last doll on the bottom, I made it during a craft day at the store. You know, I had all these star stickers, so I put them all over my picture. You know, that makes it so colorful! You know, I got this jewelry/gem thingy from my grandma, I thought it would look great right in the middle towards the top of my picture. You know, I'm an ARTIST right?

This doesn't necessarily need to be done with the art from professional artists, you could have students work with each other and write from the different perspectives.

I promise to have more exciting details about my travels real soon!

Thanks for reading! 

R.I.P. Miriam Schapiro........


Sunday, June 21, 2015

Highlights of My Trip to NY City


Where do I start? My trip to NY City was AMAZING! Extremely inspirational! Absolutely awesome!

This trip was dedicated sister time, and what a time it was! Tuesday afternoon was spent at The Metropolitan Museum of Art. This place is BIG, over 400 galleries (and according to Phyllis Levine Brown BIG is an understatement). So I preplanned my visit through their website.

First up was the Van Gogh Irises and Roses exhibit. It was the first time these four paintings have been together since his death. And they are beautiful. The colors, the brushstrokes simply marvelous! Since no photos are allowed at special exhibits, I bought ............POSTCARDS!


Then I strolled through the French Impressionists, had to see the Fabergé Eggs and the Contemporary art. Also checked out the Costume Institute and saw the exhibit China: Through the Looking Glass. It's amazing to see how art inspires fashion.

Seriously glad I decided to focus on certain galleries or I would have been overwhelmed. My sister and I had lunch there and I picked up a cool t-shirt. And some MORE postcards.

On Wednesday we walked to Mood, the fabric store featured on Project Runway. Really couldn't do a trip to NY City without checking that place out. They have floors filled with shelves of fabric!

Then we made our way over to Broadway to see a matinee of Beautiful, which is a musical about the life of Carol King. We also saw an evening performance of Kinky Boots, which tells the story of a shoe company whose product is obsolete and how it found it's niche market making sexy boots for transvestites.

Thursday we took a train to the Bronx to visit the NY Botanical Gardens, where they are currently featuring Frida Kahlo's art and garden. Again, could only take pictures in certain areas. Did get some gorgeous photos of plants and flowers that I plan to use in future art lessons.


Friday we walked to The Museum of Modern Art . Again, I preplanned this visit. I knew what I wanted to see and where I wanted to go. However, looking at everything in between, took my breath away. Saw IN REAL LIFE many of the paintings that I have posters of, and have shared with my students!


Not to mention some artists that I want to learn more about, like Fernand Leger, Umberto Boccioni and Cy Twombly.

This trip has got me thinking about ways to incorporate my experience into meaningful art lessons for my students. I promise to share them sometime in the future!

Decided this blog post had to be just the highlights-I really kept busy. I plan to share more over the summer. Right now I have a 36 hour layover at home, before my next adventure starts tomorrow!

I will be attending a summer institute at Penn State about Contemporary Art. Will blog on that next week!

Thanks for reading!!


Sunday, June 14, 2015

Curating With Postcards


I LOVE museums! And of course to me, shopping in the museum store is the best part. Okay, viewing the exhibits are VERY important and seriously meaningful. BUT, when you get to the store, you can always BUY something! Maybe a book or postcard about what you saw, which you can then share with your students, like I do.

I have lots of postcards. LOTS. Of. Postcards. The photo at the top includes only the ones I chose to use that day. In the past I have displayed them on bulletin boards in my art room. I also, have an art center in which I use the postcards.

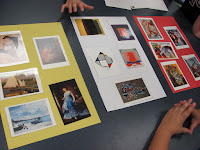
However, last summer during a teacher institute I attended, we got to play with some postcards. We actually did an activity where we were grouped at tables with a stack of them. Our assignment was to sort through the stack, take turns laying out the postcards and arranging them. We were to assemble the postcards as if we were a curator putting an exhibit together. Oh yeah, AND we got to split up and KEEP the postcards afterwards! ( Lots of postcards, remember?)

So, picture this-my art room is just about ALL packed up, AND we have 3 more days of school.....
AND I have all these postcards, and since I put in a proposal to do some museum activities at my FAEA conference, why not try out this activity with my students? So I did! AND it was incredible fun.

 Above they are busy sorting through their piles.

 Here they are starting to arrange their exhibit.

 I spoke with my students about how they should decide on a theme for grouping them. They would need to tell me the theme and about the postcards they chose. They also needed to pick out a piece of colored construction paper to place the postcards on. After all, curators do consider and change out the wall color for an exhibit!


 They were also told that they could work individually or as a team. Afterwards, it was time to share out. Students grouped together and we moved from table to table to hear about each exhibit.

 Laminating to preserve paper items is a wonderful way to make them last longer. Unfortunately it does not make them very photogenic.

It was absolutely amazing the thoughtfulness my students put into arranging the postcards. They created and told stories, in the day or life of a person, as you viewed the art in their exhibit. AND the wall colors they chose, seriously, brought out the tiniest details in the art work. WOW! Just WOW!

And you know what? They actually enjoyed the activity!! Interestingly, it didn't take very long. So next time I plan to include the concept of negotiating with other curators to borrow from them for an exhibit. Maybe have students look up info about the art and decide on its value.  Or research the artist and write wall text. There are many ways to extend this lesson to include those Higher Order Thinking skills!

Tomorrow I leave for NY to spend some quality time with my sister*. We are planning to visit MANY of the wonderful museums in NY City where I can buy more........... POSTCARDS!!

 *I was originally planning to write, my sister, who I have not seen in over 3 years. However MY family gave my the most AMAZING surprise party last night for my birthday, which is in 2 months. YES, it's a BIG one! And on a scale of 1-10, 10 being the most surprised- it was a 20! And she is here with me now! So we will fly up together! Truly feeling the love today!!

Thanks for reading!!!


Wednesday, June 10, 2015

Batik Workshop

SUMMER IS HERE!! AND I'm gonna have me some fun! Starting with this Batik Workshop I took through the VSA Florida and held at the USF School of Art and Art History. AND it was FREE!

I have not done batik in many, many, many moons. I actually think it may have been during a summer program that I took while in high school. And from what I can remember, it was done a little differently. More about that below.

While the program was free, we were told to bring a sketchbook. So I figured that meant I needed to have sketches in it. (Really-need-to-get started on one of  the many sketchbook challenges I've been following.) Anyway, since my school mascot is a lion and I'm a Leo, I decided a lion would be perfect.

We were given a white, sheet like fabric and a embroidery hoop to stretch the fabric over. Then we were told to trace or copy our design to it.


If I wanted to keep any parts white, then I needed to paint melted wax onto those areas. Afterwards, depending on the look I wanted, I could spray different colored dyes onto my fabric. I sprayed yellow, orange and a little red. Before I could continue, the fabric needed to dry, with a little help from a fan. Then whatever area that I wanted to remain those colors, was again, painted on with melted wax.


To have stronger areas of color, I painted right on the fabric with dyes. Dried the fabric again, then waxed over areas that I didn't want to turn black during the next step. Batik is at it's best, if there are cracks in the wax for the black dye to ooze into. Soooo after removing it from the hoop, I scrunched up the fabric to create some cracks.
Then it was time to soak the fabric in a tub of black dye.
 A little scary 'cause I'm hoping I have enough wax on it. Totally happy when it was pulled from the tub! Then it was spread out and rubbed dry.

Next, I ironed out the wax and TA DA!

Here are a few batiks from people who were in the workshop with me.
I love the fact that everyone did something different. We came prepared with sketchbooks and were not influenced by seeing the instructor's art. It is probably the first time I was happy with something I did at a workshop, and again, I think it was because I was prepared.

The batik I did in high school was different because instead of painting with the dyes, we blocked the colors with the wax then dipped it into a tub with the color of dye we needed. I believe I also ironed out the wax to dye other colors so as not to mix them and turn them brown.

It was much easier this time. I know I won't be doing this anytime soon with my elementary age students. But, that's okay-it's my turn to have some fun learning artsy stuff!

Thanks for Reading!