Pages

Monday, March 14, 2016

Project Peeps


Moved back to a newly renovated school. We ALL got new laptops and that meant I got the empty BOXES!!!! Enough for one grade level......... 

and there's additional goodies inside the box........ OH MY!!
Gonna save the insides for other projects.

Sooooooo I had been racking my brain for ideas in which to use those boxes with my 4th graders. Finally decided to let them do a 3D landscape. Then all of a sudden, with Easter right around the corner, the Peeps arrived!! AND I remembered the Peeps dioramas. Google Peeps Dioramas and you WILL be amazed! Not sure when I became aware of the concept of making a diorama using Peeps. The Washington Post has an annual contest, as do other newspapers. When I was in Texas for the NAEA conference it was in one of the local papers. however, I have no plans to use actual Peeps as I'm concerned about attracting ants.

Anyway several themes came to mind: birthday party, favorite book, bedroom, zoo, holiday celebration and TV shows. AND that's when I decided to do a Peeps version of Project Runway!
Here are the steps to transforming my empty box.
 Measured and cut cardboard for the runway. Gathered up colored construction paper for dressing up the rest of the box. I did use Smart Fab for the curtain, basically because it's see through.
Created the shadowed Peep for behind the curtain. Since I'm using bunnies for this, I decided to make it appear as if it was in the forest.  Glued down green paper for the base. Cut toilet paper rolls to create seating for the judges. Made bench seating for the contestants from cardboard.

 To make the judges seats I cut out part of a toilet paper roll. Then I made a tree pattern for texture.
I like to spread out the glue with my finger, it just works better that way. I cut out circles for the seats and tabbed  them to fit them into the TP rolls.

Looked through these books for inspiration:

And in case you're wondering as to how I had all this time to work on this box.......well, I'm on medical leave. I will be having surgery this week and will then need 10-12 weeks to recover. That basically means I'll possibly return with 4 days left to the school year............ yeah, not happy......
So will the 4th graders actually get to make this? No clue. I keep telling myself there's always next  year........
Here's the before:
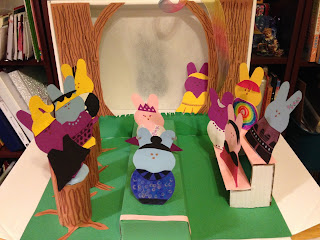
 Here's the after:
 The judges:
 The contestants:
 The models:

I can see so many possibilities for this and I know I had fun!
Happy Spring break everyone! 
And please send some good healing thoughts and or vibes my way!

Thanks for reading!


Monday, March 7, 2016

Benches on Parade

My daughter and I spent a month in Europe during the summer of 2001. And while there stumbled upon these incredible benches. Apparently the concept of public art in the form of benches started in Zurich, Switzerland. The first venture, which were cows, was a concept from artistic director Walter Knapp and was called "Land in Sicht" translated to "Countryside in View" in 1998.  When the mayor of Chicago, Peter Hanig visited the area and saw all of those wonderful cows all over the city, painted to look like anything but a cow, he brought the concept back home and launched the "Cows on Parade" as a fundraiser for the city. The cows were so popular they were reproduced and sold as collectibles. I actually have a couple (my oldest grandson called dibs on them) in a display case in my living room.  

I totally missed the cows but was lucky to find all these magnificent benches AND I also found the book at the top of this post, in one of the shops as I went through the town.

Here are some photos from the book:


They are both amazing and amusing, don't you think?? Now this wonderful public art fundraiser spawned in a variety of different ways all over the world. In addition to cows and benches there are horses, lions, manatees, turtles and many more!!

The benches are a wonderful lesson in which to introduce functional art. The art palette is my sample from the first time I did this lesson. I photographed it so I didn't have to save it. The sewing machine is the sample I made to show my students this time around.


I did a power point with art benches after a Google search just to inspire my students and of course I shared the book with them. I changed out the original directions I had, because I decided to stream line it, that's why some of it is crossed out.

Students were given the directions, 12" x 18" white paper, 18" long rulers, scissors and pencils.  Even though they had the directions I still insisted that they do this with me step by step.           
                               Using rulers with them for some reason is just tricky??????

I wanted my 5th graders to have the 3D bench up and in front of them to understand how to go about planning it. When I saw the benches, originally, certain ones made sense in front of certain shops. So I wanted them to think of where their bench might be. And to consider all four sides.


Now, unfortunately I went on medical leave right in the middle of this project. So the directions to do the back on a separate sheet of 9" x 12" paper to attach while assembling the bench didn't really get out there. Backs were left blank???   Anyway here are some fronts to feast your eyes on!


I thought these came out great!!!

The NAEA conference is about 10 days away........ Have totally whined daily to my husband about missing it this year (having surgery.....) Anyway have been asked to share the info on the photo below. I was there last year and it was a blast to meet some of MY favorite bloggers! So if you are there and can make over to the Art of Ed booth, it is totally worth it!

Below is from New Orleans, 2015 
Thanks for reading!! Hope to see you next year in New York!