Pages

Sunday, September 27, 2015

Paint Party!


I just HAD to see what all the fuss was about! There is soooo much controversy among art teachers over these paint and wine parties. That I really wanted to check it out for myself. So when my daughter suggested we do this for her birthday, I was on board with the concept. 
 This studio is less then 5 minutes from my house and is individually owned by a lovely and cheerful woman by the name of Michelle. She has done decorative painting for many years and has also written and published books on the subject. Michelle started this business 3 years ago and all the paintings in her shop, that she uses to teach with, is her original artwork.

 The studio was all set up for painting and I took a spot close to the front to be able to take lots of photos.
 Michelle had an easel set up high on a platform for everyone to see. A new canvas sat next to the painting we would all be doing. My daughter set up the evening to include a bunch of her friends. She choose the painting ahead of time and let everyone know through Facebook what was happening.


 Michelle had us start off by using a tracer to draw a circle on our canvas. Then with just water on her paintbrush she showed us the direction we should be going in with our paint. She explained the how and why of which paint brush to use. Then how we should apply and blend the colors to create the rays of the sun.
 All the paint was out and ready for us. We did have the option of changing out the colors, but would need to show up earlier for that to happen. Michelle had assistants to help people and to refill paint.


 I did find it interesting to look at all of them and to notice the subtle differences. Now since this is a 2 hour class, I always wondered how the paint dried enough to add the next layer. Think hairdryers! Can't believe that never occurred to me.......
 The next step was to paint the tree and the ground or horizon line. I am planning to bring my finished work to display in my art room WITH a sign indicating a horizontal line named for where the earth and the sky meet.
Okay, so here is where the art teacher decided to do her own thing. I just couldn't help myself.........


 Here is my daughter, Stephanie with me and our finished paintings.
And here is a group photo!

 The experience was a VERY positive one and one I would certainly do again. Everyone appeared to enjoy themselves. Not sure I understand what the controversy is all about. Because in my opinion people were together, doing art, having fun and maybe gaining a whole new respect for the arts!

You really never know what direction this experience might take people. It just might awaken the creativity in someone's soul! 

Anyway, thanks for reading! Let me know what you all think and if you have ever done this before!


Sunday, September 20, 2015

Contemporary Self Portraits

 I made the decision almost a year ago when I started this blog that I would be very upbeat and positive. However, not every lesson I do as an art teacher is successful. Below is the sample that I started, which I did because my students didn't understand what I expected from them.  I told them my hand is important to me as an artist and that is why it is in the middle of the paper. And that they should think about what is the most important part of them to have in their art work.
My idea was totally inspired by the self portrait below when I was at Penn State for a Summer Institute on Contemporary Art.

 When school started back up last month I thought this would be a very different and exciting way to do self portraits with my 3rd-5th graders. We talked about the difference between a portrait and a self portrait. I showed students an enlarged photo of my inspiration. Looking closely you can see a lot of little vignettes that tell a story. My "I can" statement was "I can tell a story about myself using images".


We talked about the clues hidden in a self portrait or a portrait that might give us insight into that person. I had them write a list of their favorite things. Students practiced doing facial features and hands in their sketchbooks. The instructions sheets below can be found in Triarco.
They practiced doing 3D or joined figures, to get away from doing stick figures. This way they could include people in their story.

They practiced drawing out their stories in their sketchbooks.

Then they had the choice to color with markers, colored pencils or paint.

Shown are the the self portraits of the students that understood the lesson and were successful. Too many of the students copied me and just drew a hand in the middle of their paper. Some students heard the word paint and started over and just painted something not even closely related to the assignment. AND many still drew stick figures! Many students thought they were finished because they did the artwork in their sketchbooks, not realizing that, that is where you plan out your work. Obviously my communication to them was severely lacking!

While there were successful self portraits throughout all 3 grade levels, the percentage wasn't high enough for me to consider this lesson a success. In reflecting back maybe I should have limited it to one image that would tell us something about them. Or had samples of different ways to approach this. If I do this again I will have photos of student work to share. Perhaps both the ones that worked and the ones that didn't. I am also seriously considering having students do an artist statement to reflect on the assignment and what they learned from it.

I would be very interested in hearing about the lessons that you didn't think worked.

Thanks for reading!!


Sunday, September 13, 2015

Painting and Learning About Lines

 Art Is....... a wonderful way to introduce the Elements of Art to children. That is why I read the book to my kindergarten students. After reading the book we went over the different styles/kinds of lines and the directions a line might go in. Then I passed out sketchbooks for students to draw the lines they learned.
 When their note taking was done students went to their seats to draw lines with a black crayon, creating patterns with their new knowledge.
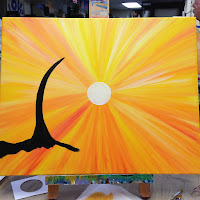
Since the beginning of the school year is all about establishing routines, I decided we would paint our beautiful lines. Thereby giving me the opportunity to teach them the procedures for painting.
The first photo is how the trays were set up to distribute to students. I demonstrated how to wipe off extra water from the paint brush, by using the side of the water container. WE DO NOT TAP OUR PAINT BRUSHES ON THE EDGE OF OUR WATER CONTAINERS! EVER! Students could also use the sponge to wipe brushes.
I demonstrated how to hold the paintbrush and how to lift the paint up from the paint tray. I also informed my lovely students to CLEAN paint brushes between colors! AND how to clean off the top of the paint if someone forgot and got the paint dirty. 

AND apparently I forgot I was dealing with really young children and should have been watching them a little more closely!  As you can see from my before and after pictures above. Sigh.........


 Part of the routine is for students to put away their paint tray and place their painting on the drying rack.
Art work is placed on the drying rack starting at the bottom shelve and working our way up to the top. I separate classes with a tray or mat board. At the top of the drying rack is the class box with their classroom teacher's name on it.

Oh and after we cleaned up and students were on line I used my arms to show the directions a line might go in, children followed my arm movements and repeated after me for each way I moved my arms.

To extend our learning about lines and to teach students how to use Play Doh in the art room I made these practice sheets after seeing them on this site. Ms. Gruendler looks like she has fun teaching her students about lines. This is my grandson practicing for next week's lesson.

He apparently went home and even though he had a packet of homework to do this week from his teacher, he told my daughter he needed to practice his lines for art.


Here are some finished paisleys from last week's lines and patterns with my 1st and 2nd graders.

AND I finally got the results of my E.O.C.'s from June. Yes, MY results. Yes, students took the exams. BUT, aren't I the one being tested? This IS a discussion for another day.........
I gotta say I'm feeling pretty pleased with the results.  Especially since the test came from district. And it was the first time my students were tested in art.

Please comment below whether or not you test your students and what your thoughts are.

Thanks for reading and please consider following me!